Monday, 29 June 2020

5 Things to Keep in Mind While Buying Electronic Gadgets

Buying electronic gadgets is not an easy task. A little planning not only can help you buy the best gadgets, but also will save money, says an expert.

1. Check the Calendar
If you are in no hurry, then wait for festive occasions to buy gadgets. Festive season is always loaded with low prices on gadgets. You can always avail best deals on such days.
2. Check Reviews
Never get tempted by alluring advertisements for gadgets. Before you buy any gadget, always check consumer and product reviews first. This can be done both online and offline. No matter how enticing the advertisement looks, with the reviews you can easily find out if the gadget will perform as advertised or not.
3. Comparison Shopping Through App
Comparison shopping online is an old concept, but now there are more innovative options available which can make comparison shopping even easier. Thanks to the app revolution, smartphone owners can get prompt price comparisons both for online retailers and local shops. But make sure that you always refer to the apps that provide factual data and not just the marketing data.
4. Beware of Online Scammers
When you buy a gadget online make sure that you are not being scammed. Always shop from well-known and reputed websit
es. Online marketplaces have a lot of sellers on them and that’s why the need to be careful as not everyone guarantees authentic products. For a complete surety buy it from a source which guarantees that the product comes with the manufacturer’s warranty.
5. Re-Check
Last and most important, check that the product is not opened or tampered with. If you are buying it offline, you can check it right at the counter. For online, check once you get the shipment. For instance a mobile phone always comes with a seal on the box. Ensure that’s not open. Also check the serial number to find out that the product is genuine or not.

Thursday, 18 June 2020

Maggi Masala Noodles recipes


i guess maggi noodles is one such recipe which i started to cook from my school days. i loved maggi masala noodles so much that there are days i used to consume it twice a day. my mom use to pack maggi masala noodles for my lunch and after i return back home i use to prepare it for my evening snack. i still remember 5 rupees noodles packet which was more than sufficient to quench the maggi noodles craving. i guess maggi has stopped now to sell 5 rupees small packet.

there are several variations and innovations to this simple instant 2 minute maggi noodles recipe. the first variation is to prepare maggi noodles sandwich by stuffing the maggi masala noodles between 2 sandwich breads. optionally, the sandwich can also be grilled further for a crisp taste. the second variation is to prepare achari maggi noodles recipe by adding spicy mango pickle after the noodles is prepared. the other variation is to prepare the maggi momos by stuffing the noodles in momos.

INSTRUCTIONS

  • firstly, in a large kadai heat oil and saute garlic.
  • further add onion, and saute till they change colour.
  • also add capsicum and saute for a minute.
  • additionally add tomato and saute till they turn soft and mushy.
  • furthermore, add ¼ cup of brocolli and ¼ cup of peas. saute for 2 minutes.
  • also add ½ tsp turmeric powder, ½ tsp red chilli powder and ¼ tsp garam masala powder. saute for a minute on low flame.
  • add 2 cups of water and get to boil.
  • once the water begins to boil, add 2 sachets maggi masala and salt.
  • stir well and get the water to boil.
  • add in 2 maggi noodles breaking into 2 half.
  • spread and cook both the sides.
  • boil for 2 minutes and stir occasionally.
  • cook till the noodels absorb water and gets cooked completely.
  • sprinkle chaat masala for more flavours just before serving.
  • finally, maggi masala recipe is ready to be served hot.

Wednesday, 22 April 2020

Stay fit at home: best workout tips


Exercise is not only an immune booster but may also make a significant difference to your mental health. Unfortunately, it’s not possible for everyone to head outside into a backyard for some fresh air. Here are some tips to get your daily burst of exercise inside your home.


1. Don’t complicate things

If you didn’t manage to gather some equipment before shops closed, this doesn’t mean that you can’t exercise at home. Utilise whatever you can – that yoga mat you've never used before, a soft towel, a low bench, canned food to use as dumbbells – they can all be used with great success. You can also rely on body weight exercises such as push-ups, sit-ups and squats, and combine them with high-intensity moves such as star jumps or high-knees. This article gives great tips on what exercises to do, and these are the top five exercises you can easily do in your lounge.

2. Go online

Not only will some jobs be done remotely during this time, but we will also have to rely on the internet for fitness classes or guidance. Finding an online video will especially help if you are a beginner and not sure how to put an effective home workout together. Whether you are willing to pay for an app, or find free options, the choices are endless.

3. Give it your full attention

Focus solely on your exercise routine during the time you set aside for fitness. Now is not the time to read an email or listen to the news in the background. Use this time not only to boost your body, but also to give your mental health a break, especially during times where we feel anxious. If you simply can’t focus during a sweat session, try yoga or meditation to help you breathe. Not sure yoga is for you? This article may convince you.
Don't want a long workout? This 4-minute workout can burn fat and speed up the metabolism if you are looking for something short, but effective. 

4. Gather the pets

While you are not allowed to take your dogs for a walk, they also need to be entertained. Why don’t you make it a team effort? Play tug-of-war and fetch, but as your dog searches for the ball, do a quick run-on-the spot or a set of squats or lunges. As silly as it sounds, it can be great fun – and your dog will be amused.

5. Try something new – but don’t overthink it

We’ve heard how we are supposed to use this time in lockdown create new habits or try a new form of exercise. For many, that is simply not realistic as we might feel anxious and depressed about an unforeseen future. Have fun and try something new by all means, but don’t feel the pressure to do so. If you’ve never incorporated strength training in your running routine, now might be the time to work properly on your form, for example. Time to dust off those dumbbells and that bench in the garage!

Friday, 20 March 2020

Top 5 Fastest Bikes in the World

5. Yamaha YZF R1: 186 mph (297 km/h)
This motorcycle is produced by renowned Japan’s motorcycle manufacturer, Yamaha. The engine used for this motorcycle is forward inclined Parallel 4-cylinder, 20 valves, DOHC, liquid-cooled. This motorcycle can be expected to reach 186 mph (297 km/h) on its top speed. This motorcycle can produce 128.2 horsepower (95.6 Kw) at 10000 rpm. It’s using constant mesh 6 speed transmission system.

fastest motorcycle Yamaha YZF R1


4. Honda CBR1100XX Blackbird: 190 mph (310 km/h)
This motorcycle was released by Japan leading motorcycle manufacturer, Honda. This motorcycle is using 1137 cc, liquid-cooled, four cylinder engine. The engine can make this motorcycle reach 190 mph (310 km/h) while it’s running on top speed. This motorcycle can produce 114 kw (153 hp) @ 10,000 rpm power. The transmission system used by this motorcycle is close-ratio 6-speed transmission.

fastest motorcycle Honda CBR 1100 XX


3. MTT Turbine Superbike Y2K: 227 mph (365 km/h)
This superbike is running using Royl Royce 250-C20 turbo shaft engine. The top speed can be reached by this motorcycle is 227 mph (365 km/h) while it can produce 320 horsepower (239 Kw) @ 52,000 rpm. The transmission system used by this motorcycle is different than other motorcycle by simply using 2 speed automatic transmission.

fastest motorcycle MTT Turbine Superbike Y2K


2. Suzuki Hayabusa: 248 mph (397 km/h)
This Japanese origin motorcycle is using 1340 cc, 4 stroke, four cylinder, liquid-cooled, DOHC, 16 valve engine. This Suzuki manufactured motorcycle can reach 248 mph (392 km/h) on its top speed. The power can be produced is 197 horsepower (147 kw) @ 6750 rpm. Transmission system used is 6 speeds with constant mesh.

fastest motorcycle Suzuki Hayabusa


1. Dodge Tomahawk: 350 mph (560 km/h)
This Dodge Tomahawk is very limited motorcycle that use 10 cylinder, 90 degrees v-type engine. It can reach 350 mph (560 km/h) when it’s on top speed. This motorcycle can produce 500 horsepower (370 Kw) @ 5600 rpm. This motorcycle is using a simple transmission system by using just 2 speed manual transmission.

fastest motorcycle Dodge Tomahawk

Thursday, 19 March 2020

How to Make and Form Pizza Dough: A Step-by-Step Guide

Step 1: Getting Started
Start with a medium bowl that's been lightly coated with olive oil. Add warm water (about 110 degrees F), dry yeast and sugar. Note: The activated yeast feeds on the sugar and makes the dough rise. In another bowl, combine flour and salt. Have a fork, cutting board, knife, pizza pan and rolling pin (optional) handy.
Step 2: Make a Well in the Center of the Dough
In the bowl containing the flour and salt, make a well in the center and add the yeast. Tip: If the yeast doesn't foam, check the expiration date and water temperature (should be approximately 110 degrees F). Add the olive oil. Use a fork to pull the dry into the wet, then mix.
Step 3: Knead the Dough
When the dough starts to come together, get in there with your hands and knead it for a few minutes on a lightly floured board. Use the heel of your hand to push the dough down and forward. Give it a few turns. You're done when the dough is a little tacky.
Step 4: Cover the Dough in Plastic Wrap
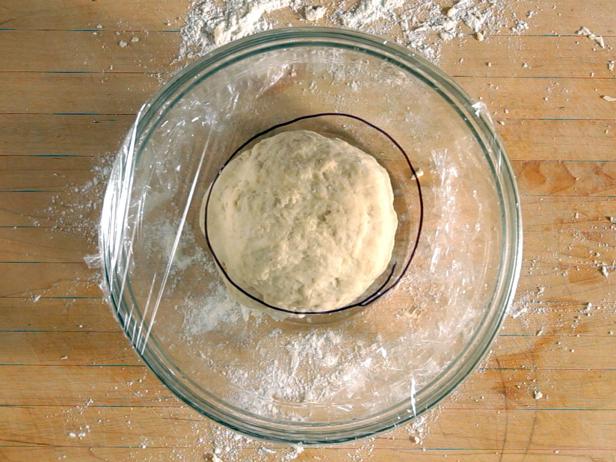
Place the kneaded dough into the oiled bowl, cover with plastic wrap and let it rise in a warm spot until it doubles in size. Tip: Chart the progress of the rising dough by using a marker on the plastic wrap to circle the size of the ball of dough at the beginning of the process. It can take anywhere from 1 to 2 hours for the dough to rise, depending on the recipe and ambient temperature.
Step 5: Check to See If the Dough Is Done
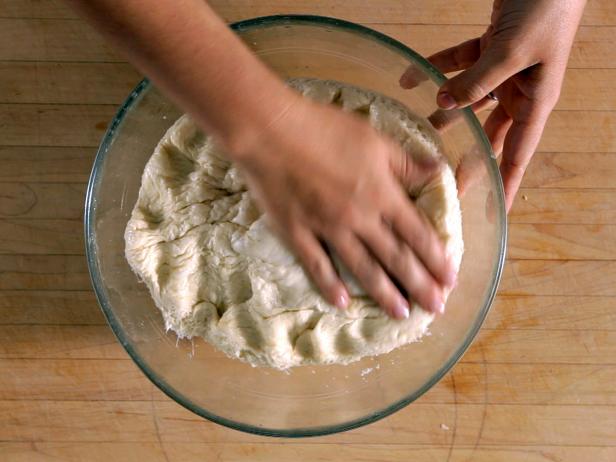
If the dough leaves an indentation when poked, it's ready.
Step 6: Divide the Dough
Once the dough has risen properly, use a knife to divide it. The larger the piece, the bigger the pizza; the smaller portions are easier to handle at home. Form into balls for individual pizzas, and place on a plate. Cover with a damp cloth. Let the balls of dough rest until you poke them and see an indentation.
Step 7: Shape the Dough
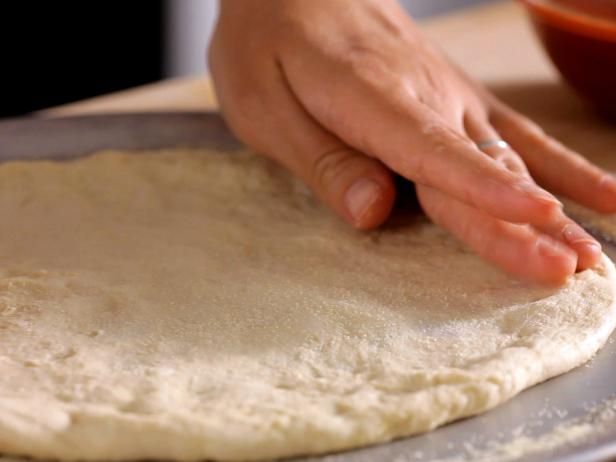
Sprinkle a pizza pan with a little semolina for good separation and a nutty crunch. Place a ball of dough in the center of the pan and spread it out, using a rolling pin or your hands. Spin it. Pull the dough to the edges of the pan to thin out the center. Add some more semolina for better separation. Make sure the thickness is even.
Step 8: Top the Pizza and Bake
Top the spread dough with your favorite ingredients and bake in a 500-degree F oven for approximately 10 minutes. Perfect pizza every time. 

Friday, 13 March 2020

Apple iPhone 11 Pro review: If money is not an issue then this is the complete package

Before I begin my review of the iPhone 11 Pro, let’s rewind to the 2007 Apple keynote. Steve Jobs, the then CEO, and co-founder of Apple started his presentation by talking about this revolutionary product that is a mobile phone, a widescreen iPod with touch controls and a breakthrough internet communications device, which is today commonly known as the iPhone. 
Sure it might not seem like a big deal today, but back in 2007, the original iPhone was a breakthrough device that set the stage for the revolution of the modern smartphone era. 
Apple, then, soon started its iconic ‘If you don’t have an iPhone, you don’t have an iPhone’ campaign. The series of ads were all about what features you miss out on other smartphones that you could get only on an iPhone. Collectively, the iPhone has been put forward as ‘The Smartphone’ that consumers should buy.
Jump to 2019, and the iPhone has ‘Pro’gressed a long way. With the iPhone 11 Pro, you get a close-to-full screen display, a dominant performance unit that is far ahead from the next-best, and improved cameras. The iPhone 11 Pro also has the best battery life ever in an iPhone of its size. 
The price, too, has sky-rocketed to a premium of nearly Rs 1 lakh for the base variant. Is Apple’s latest and greatest iPhone worth your money? 
I've been using the iPhone 11 Pro for well over a month and here is what I think about it.
Design and Display
Apple is known for not making any significant year-on-year design changes on the iPhone.
From the front, the iPhone 11 Pro continues to have the same design architecture as the iPhone X and the iPhone XS. Having said that, iPhone users who plan to upgrade who are most likely to be on an iPhone 7 (like me) or later, might find this to be quite a new design.
There’s a 5.8-inch screen with a wide notch on top for the front camera and Face ID sensors. Compared to the previous generation, Apple says the Face ID is faster and can now detect the face from a wider range. It does feel a bit faster, but you still need to lean over and look directly at the iPhone when its kept on a flat surface like your work desk. 
After reviewing phones like the OnePlus 7T (Review) and the Realme X2 Pro (Review), I thought the wider notch on the iPhone 11 Pro would be bothersome. But to be honest, it wasn’t the case.
Unlock the iPhone 11 Pro, and you will see that the OLED screen, which Apple calls Super Retina XDR, is also brighter and better. The display can get as bright as 800 nits in normal conditions and can hit even brighter — up to 1,200 nits — when viewing HDR10 content.
The iPhone 11 Pro’s display offers excellent levels of colour accuracy and sharpness, thanks to the wide colour gamut and TrueTone panel. You would appreciate the screen like I did while watching shows on streaming services like Netflix and Apple TV+. The display does make you notice those deep blacks, especially when you are watching shows like Stranger Things where the scenes are relatively dark. 
What complements the viewing experience is the combination of Dolby Atmos and spatial surround sound that together offer a loud and clear audio experience.
Even in direct sunlight, the screen performed quite impressively, and I didn’t face any issues with brightness levels between 60-80 percent. I kept the True Tone display (TTD) enabled most of the time during my over-a-month long experience. True Tone display, basically, adjusts the colour and intensity of the screen depending upon the ambient light. With TTD off, you’ll notice that the screen’s colour temperature leans a bit towards the cooler side. 
To sum up the display review on the iPhone 11 Pro, I wouldn’t mind calling it the best display on a smartphone. If you don't believe me, check the DisplayMate score which rates the iPhone 11 Pro’s display as A+.
If I were to complain, I wish Apple could’ve launched the iPhone 11 Pro and the iPhone 11 Pro Max with a ProMotion high refresh rate display. 

Thursday, 12 March 2020

5 Tips That Will Change How You Clean Your Kitchen


Use Tea to Save Your Stove from Splatters

This tip went viral when our books premiered on EVINE Live: Use tea to keep gunk from sticking to your stove. Brew a pot of tea that is four times normal strength, then wipe it on your stove. The tannins in the tea will make it hard for grease and food to stick, making cleaning quick and easy.

DIY All-Purpose Orange Cleaner

We love the scent of orange in our kitchen, and we love this all-purpose cleaner made from orange peels even more. It works great on all kinds of kitchen surfaces like countertops, sinks, and greasy stoves, and all you need are the peels of several oranges, plain white vinegar, water, a spray bottle, and a glass jar with screw-top lid (a Mason jar works perfectly). Place the orange peels into the glass jar, cover with vinegar, and leave for several weeks in a cool spot. Then transfer some of the mixture to a spray bottle and add two parts water. Shake to combine, and it’s ready to use. Your family will love the scent!

Second Use for Used Baking Soda

Instead of throwing away baking soda away when it’s finished its 30-day stint in your fridge, dump it down the garbage disposal with running water. It will keep your disposal fresh too!

Make Oven Cleaning Easy

The secret to make oven cleaning easy is to take care of spills the second they happen. If there’s a sticky mess on the bottom of your oven,  sprinkle salt on top as soon as possible. After a little while in a hot oven, the spill will turn to ash and you can easily wipe it up with a wet cloth once your oven cools.

Top of the Fridge? No Problem

The top of the refrigerator can get gross, fast, thanks to tiny food particles that float into the air on steam and end up there. Make it easy to clean by topping it with a layer of plastic wrap each month. Then simply remove the plastic wrap and replace. You can barely see it, and you’ll never have to wipe down the top of your fridge again.